7 Easy Steps to Install Vinyl Decals Beautifully
Vinyl decals can be used indoors or outdoors, are weather-resistant and durable, available in a wide selection of colors and styles, and available in permanent or removable materials. They are long-lasting and can be used on vehicles (glass or bodywork), laptops, glassware, bikes, water bottles, and more.
In addition to our wide selection of hobby electronic products, we have been providing vinyl decals since 1998 and are now available on our web site.
To aid in installing your vinyl decals, we have prepared a quick tutorial outlining the easy steps necessary to install your decals.
Looking for our Amateur Call Decal Sheet? We have updated our popular Amateur Call Decal Sheet during the fall of 2020.
Want a single-page document you can print out and review? Have a look at our Vinyl Decal – How To Install guide in PDF format.
Installing a Vinyl Decal
Surface Preparation
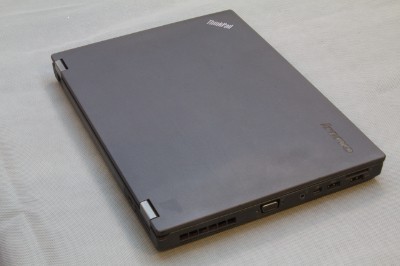
Preparing The Surface For The Decal
The surface where you will install the decal should be between 50°F (10°C) and 90°F (32°C) for the best adhesion. Application is not recommended in cooler temperatures as the decal adhesive will only set properly at warmer temperatures.
Thoroughly clean the area where the decal is to be positioned with a microfiber cloth and rubbing alcohol or soap and water. Do not use an ammonia-based cleaner; they leave a thin residue that prevents the decal from adhering correctly.
Once cleaned, let the area dry completely.
Decal Preparation
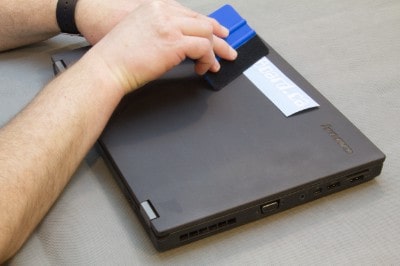
Prepare Your Decal
If you receive multiple decals on one sheet, you may wish to cut them out and apply them separately. This will make them easier to position and mistakes less likely.
Using a squeegee or credit card, press firmly on the decal to ensure that the decal sticks to the application transfer paper while removing any air bubbles that may have formed during shipping. Doing this will make the installation of the decal easier when removing the protective transfer paper layer.
Positioning
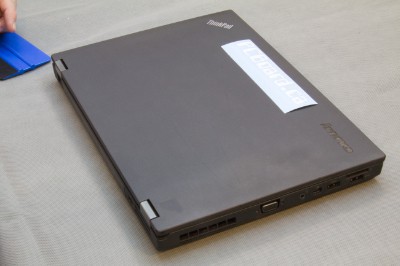
Identify A Location For The Decal
Determine a suitable placement for your decal. Determining the exact placement will require a little measurement. Measure your decal, then measure the placement area to determine the center or alignment. Use a ruler, measuring tape, level, or other straight edge devices to ensure that your decal is aligned and mark the measurements and angles with painter’s tape.
Take a few steps back and look at your graphic from a distance to ensure it’s in the correct location.
If installing on a vehicle, make sure that the decal is not in the wiper blade path.
Peel The Backing
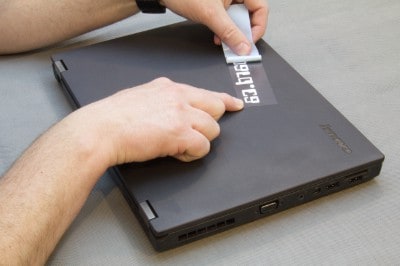
Removing The Backing Material
Gently separate the protective backing material from the decal. Try not to touch the decal’s adhesive back as this could leave marks or dirt on the decal. Slowly remove the application tape, peeling it back. Watch as you peel off the backing. If any of the decal lifts off the backing material, press it back down with the knife.
Position The Decal
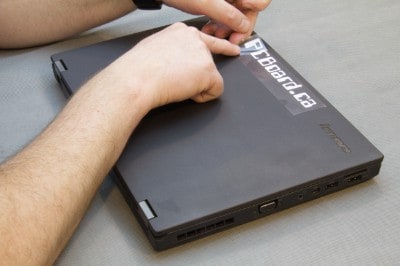
Position The Decal Into Place
Apply the decal to the cleaned surface, starting from one side and working your way to the other side while firmly setting it into place. Move slowly across the decal, allowing it to seal into place, keeping the decal pulled tight to prevent bubbles and wrinkles.
Squeegee Into Place

Removing Any Air Bubbles
Using a squeegee or credit card, apply firm pressure from the center to the decal’s sides to firmly set into place. Keep rubbing the decal into position to remove any wrinkles or air bubbles. Use overlapping strokes, starting at the center and working out toward each edge. Use a smooth, slow stroke and go over the entire backing.
Remove Transfer Tape
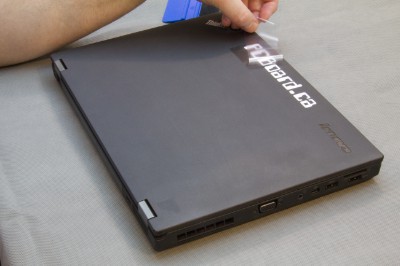
Removing The Application Transfer Tape
Leave the transfer tape on the decal while it dries. While you may be able to remove the transfer tape immediately, it’s best to leave it to dry. Waiting 30 minutes makes removing the transfer tape more effortless and reduce the chances to pull any of the decal off. Do not attempt to speed up the process using a heat source (hairdryer), as it may melt the decal.
With the decal applied firmly and all wrinkles or bubbles removed, peel back the transfer tape from the top of the decal. Start from one end of the decal and slowly peel the tape off while making sure to hold the decal in place if it wants to come up with the tape. If any of the decal lifts off, press it back down with the knife. Tip: If the transfer tape does not seem to want to come off like it should, leave the tape on for another hour and come back. This will allow the decal to bond more firmly to the surface and make it easier to remove the transfer tape.
Installation Complete
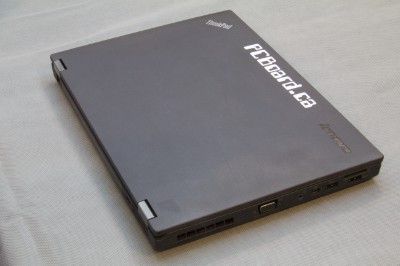
Admire Your New Decal
Your new decal installation is complete. Permanent decals for outdoor use will last for more than five years. Removable decals, typically used indoors or outdoors for less-permanent installations, will last about the same duration but are much easier to remove.
Removing a Vinyl Decal
There are two significant categories of vinyl decals. Permanent and Removable. A removable decal uses a water-based adhesive, while permanent decals use a solvent-based adhesive. Both the permanent and removable decals can be removed; the permanent is slightly more time consuming to remove.
The removable decal has an anticipated life indoors at approximately three years, while a permanent decal is good for around six years.
Heat the decal with a hairdryer (try not to use a heat gun as they can get too warm and damage the surface you are removing the decal from). Move heat slowly over the edges of the vinyl until you see lift or bubbling. Once you have a loose edge, slide a scraper under the vinyl and slowly work with the heat to lift the rest of the vinyl.
Once the decal is removed, the permanent style may leave a slight residue (adhesive). Use an adhesive remover like Goo-Gone or Goof-Off to remove the remaining adhesive. The only word of caution, if applying to the painted area of a car is that vinyl, like anything you cover paint with, has an SPF factor so it will block the sun’s UV rays, and while the paint around it fades over time, the area under the decal will be protected. If you remove the decal the paint will typically be darker and not match the rest of the paint in the surrounding area.
After removing the decal, the area can be washed with regular soap and water.