Easily Configure Arduino IDE for NodeMCU
Configure and Setup Arduino IDE To Use the NodeMCU ESP8266
The NodeMCU offers a variety of development environments, including compatibility with the Arduino IDE (Integrated Development Environment). The NodeMCU/ESP8266 community took the IDE selection a step further by creating an Arduino add-on. If you’re just getting started programming the ESP8266 or even an established developer, this is the highly recommended environment. Visit our dedicated page on setting up and configuring the Arduino IDE for a NodeMCU ESP8266.
Download and Install the Arduino IDE
 The Arduino IDE (Integrated Development Environment) is available for no cost. You can visit the Arduino site (www.arduino.cc), which is an excellent resource for all-things Arudino.
From there, you will want to download the latest Arduino IDE (https://www.arduino.cc/en/Main/Software)
After downloading the IDE, proceed to install using the default setup options.
Add NodeMCU Library to the IDE
The IDE needs to know details about the NodeMCU module. This information is available in a configuration file which will is added to the IDE.
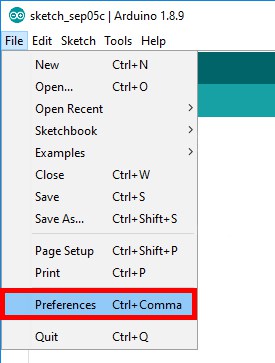
Select the File…Preferences
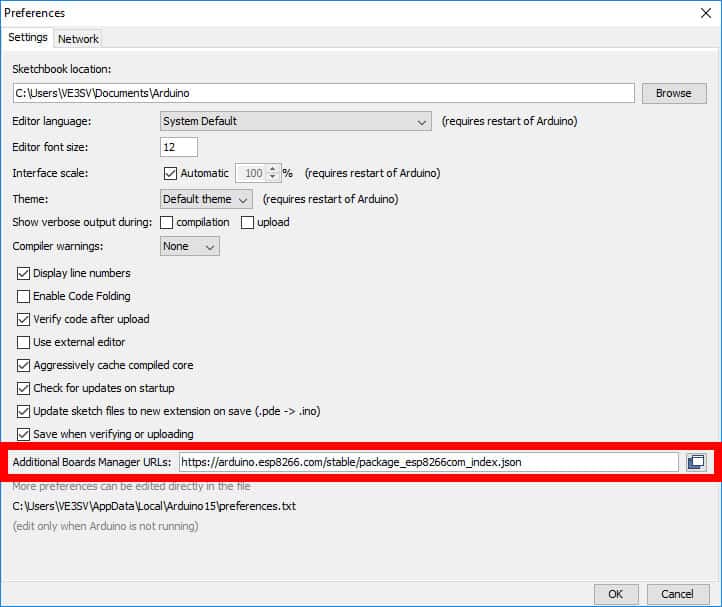
This will open up a new window, where we set the IDE to point to the configuration file.
In the field “Additional Boards Manager URLs:” enter
http://arduino.esp8266.com/stable/package_esp8266com_index.json
Select the OK button at the bottom of the window when the link address is entered.
Selecting the NodeMCU Board Driver
The NodeMCU now needs to be selected in the IDE.
Navigate to the Boards Manager from the Tools…Board…Boards Manager menu option (the very first option in the list).
A new options window will appear.
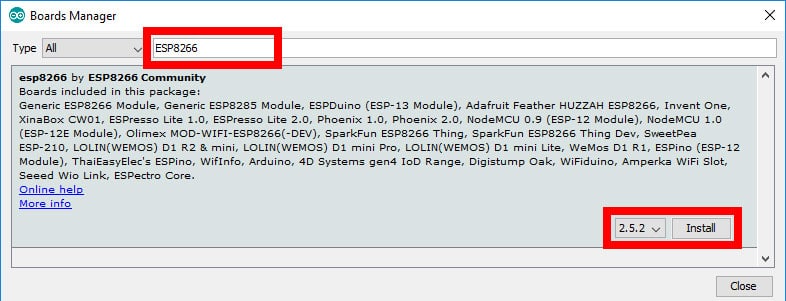
From the Boards Manager window, enter esp8266 in the search bar.
This will display the new ESP8266 driver as supplied by the ESP8266 Community. At the bottom of the options box, select the version to be set up (select the most recent version).
Now select Install to complete the installation of the driver which will take a few seconds to download and install.
Select Close to complete the installation.
Selecting Board Version
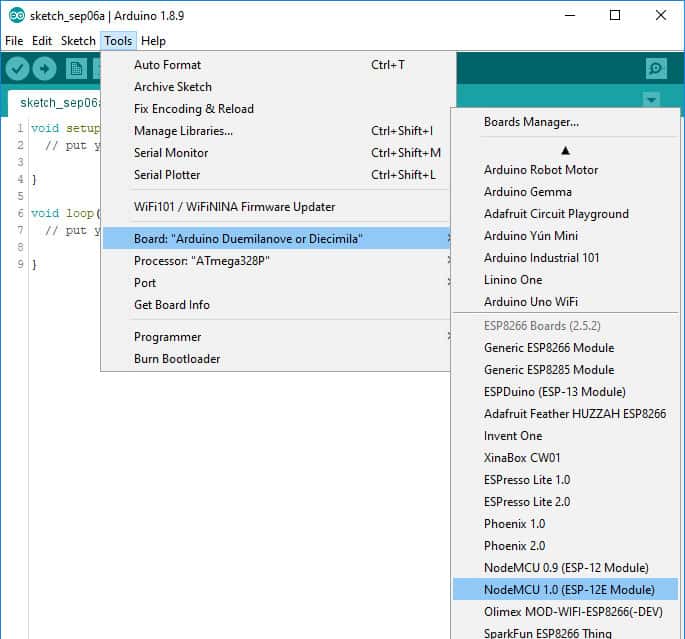
Now from the Tools…Board menu, the dropdown list will contain many different hardware boards.
Scroll down and select the NodeMCU 1.0 (ESP-12E Module).
Defining The Communications Port
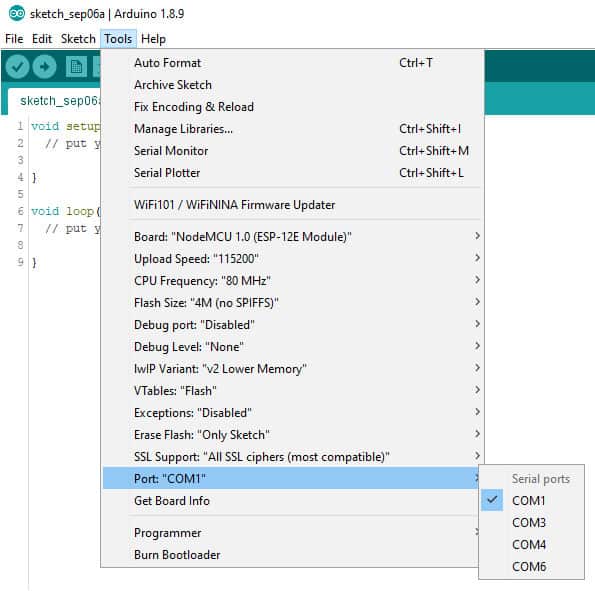
The communications port must be defined to allow the Arduino IDE to communicate with the NodeMCU. Connect your PC by a USB cable to the NodeMCU.
After connection, the PC will provide power to the NodeMCU. The communication port used will vary by system.
To determine which communications port has been selected on your system, select the Tools…Port menu option.
The options list will present the available COM ports. For our example, our NodeMCU added COM6 and will be selected by clicking on COM6.
Shown below the Board selection, are several NodeMCU settings. These include CPU Frequency, Flash Size, and also Upload Speed. If Upload Speed is not set to 115200, select the speed of 115200 from the options from that item. The speed of 115200 is the optimum transfer rate that is used to transfer data to and from the NodeMCU.
Arduino IDE NodeMCU Configuration Complete
This completes the configuration of the Arduino IDE to recognize and generate code for the NodeMCU. Coding syntax for the NodeMCU in the IDE follows the Arduino framework, including pin designations and communications ports.
Below is a coding example for the NodeMCU which flashes an onboard LED and also has allows the NodeMCU to generate a text that can be seen through the serial monitor.
Code To Test NodeMCU Functionality
This is a simple sketch that will flash the LED on pin D0 every 1/4 second (250mS). The routine will also have the NodeMCU send a small text message over the communication channel and will display it in the Serial Monitor.
Copy the code below and paste it into a blank sketch in the IDE.
void setup() {
  pinMode(D0, OUTPUT);  // Blue LED Beside CP2102
  Serial.begin(9600);
}

void loop() {
  Serial.println("Welcome To PCBoard.ca");  // display message on console
  digitalWrite(D0, HIGH);
  delay(500);
  digitalWrite(D0, LOW);

  delay(250);
}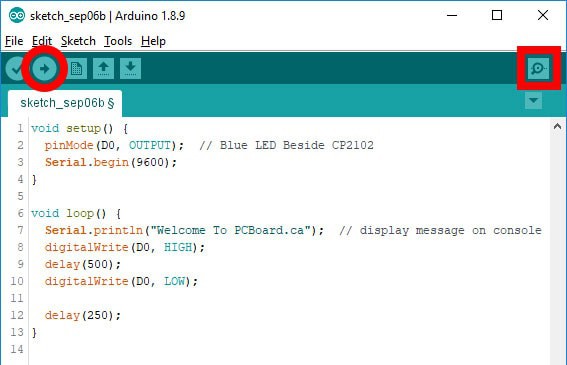
After entering the sketch, press the right-facing arrow to Compile and Upload the code to the NodeMCU. You will be prompted to save the sketch, name the sketch “blinky” and press Save. The saving, compiling, and uploading of the sketch to the NodeMCU may take a minute or two depending on the speed of your system.
After the compile and upload are complete, the LED on the NodeMCU will begin to blink. In some situations, the RST (reset) may need to be pressed to reset the NodeMCU after uploading.
Press the Serial Monitor icon (located on the upper right side of the screen). This will display the welcome message which is generated on the NodeMCU.
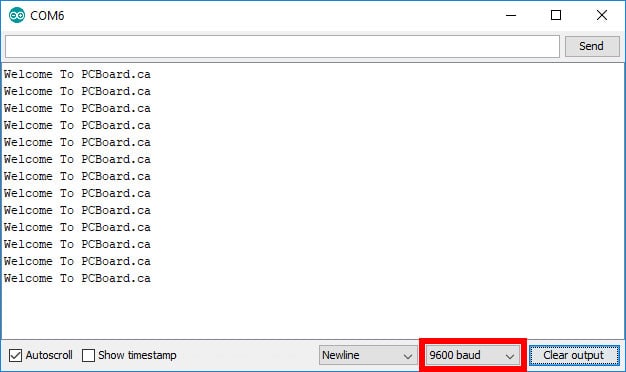
The Serial Monitor will display text as the NodeMCU generates it.
If you do not see text, check the terminal speed box located at the bottom of the window (showing in Red). It must be set for 9600 to display text coming from the NodeMCU.
Arduino IDE and NodeMCU – Conclusion
This completes the configuration of the Arduino IDE to allow for the programming of the NodeMCU ESP8266. The ability to interface to the NodeMCU is endless with everything from LEDs, temperature sensors, motor controllers and servos, LCD displays, moisture sensors, and more. The possibilities are endless.
There are many great resources for programming information and coding examples. YouTube is an excellent place to watch for information and tutorials, along with the Arduino support site.